Home >> Seal >>O-Rings >> O-Ring Groove Design
O-Ring Groove Design
Groove Design for O-Ring Installation
Technical Resources
- O-Ring Catalogue
- Comparison of Properties
- Temperature & Durometer
- Elastomers
- Fluid Compatibility Selector
- Groove Design
- Shelf Life and Storage
- Causes of O-Ring Failure
- O-Ring Design & Lubrication
- Glossary of O-Ring Terms
| Uniform Dash Numbers | Actual Cross Section Diameter | Diametrical Squeeze (Minimum) | Gland Depth F | Groove Width G +/- .003 | Flange Groove | Diametrical Clearance (Maximum) D | Eccentricity3 | Radius (R) | ||||||
|---|---|---|---|---|---|---|---|---|---|---|---|---|---|---|
| Dynamic | Static | Dynamic +.000 -.001 | Static +.000 -.004 | No Backup Ring | One Backup Ring | Two Backup Rings | Depth H | K min | 500 PSI | 1500 PSI | ||||
| – 001 | .040 + .003 | .004 | .006 | .033 | .031 | .056 | – | – | .028/.032 | .068 | .005 | .0025 | .002 | .010 |
| – 002 | .050 + .003 | .005 | .008 | .042 | .039 | .070 | – | – | .037/.041 | .078 | .006 | .003 | .002 | .010 |
| – 003 | .060 + .003 | .006 | .009 | .051 | .048 | .084 | – | – | .045/.050 | .091 | .007 | .0035 | .002 | .016 |
| – 004 thru –050 | .070 + .003 | .007 | .011 | .056 | .051 | .098 | .140 | .207 | .051/.061 | .095 | .008 | .004 | .002 | .016 |
| 102 thru –178 | .103 + .003 | .010 | .015 | .090 | .082 | .144 | .173 | .240 | .081/.091 | .140 | .009 | .004 | .002 | .016 |
| -201 thru –284 | .139 + .004 | .014 | .021 | .121 | .114 | .195 | .210 | .277 | .110/.120 | .190 | .010 | .006 | .003 | .031 |
| -309 thru –395 | .210 + .005 | .021 | .032 | .184 | .173 | .294 | .313 | .412 | .170/.180 | .280 | .011 | .007 | .004 | .031 |
| -425 thru – 475 | .275 + .006 | .028 | .042 | .241 | .227 | .385 | .410 | .540 | .231/.241 | .370 | .012 | .008 | .005 | .047 |
Note 1. The following sizes are not normally recommended for dynamic service, although special applications may permit their use:
| – 001 thru – 003 – 013 thru – 050 | |
| – 117 thru – 178 – 223 thru – 284 | |
| – 350 thru – 395 – 461 thru – 475 |
Note 2. Clearances shown based on 70 durometer materials. The clearances must be held to an absolute minimum consistent with design requirments for temperature variations and should not exceed the values shown.
Note 3. Total indicator reading between groove and adjacent bearing surface. All surfaces and corners must be free of tool marks and scratches.
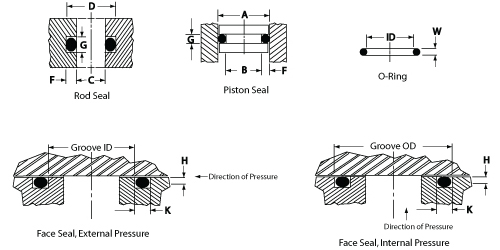
O-Ring groove and dimensions may be calculated as follows (please refer to chart above)
| Given: | Example | Given: | Example |
| Rod Diameter C | = 500 | Cylinder Bore A | = 1000 |
| O-ring Cross Section W | = 3/32″ nominal | O-ring Cross Section W | = 1/8″ nominal |
| Dynamic Application | Static application | ||
| No back-ups required | No back-ups required | ||
| Determine | Determine | ||
| O-ring size | = AS-568-112(1/2″ ID x 3/32″W) | O-ring size | = AS-568-320(1″ OD x 1/8″ W) |
| Gland Depth F | = 0.090 +.000/-.001″ (from chart) | Gland Depth F | = 0.114 + .000/-.004″(from chart) |
| Groove Width G | = .144 +/- .003″ (from chart) | Groove Width G | = .198 +/-.003″ (from chart) |
| Rod Gland D | = C + 2F = .500″ + 2 x .090″ = .680″ |
= A-2F = 1.000″ -2 x .114 = .772″ |


