Home >> Shaft Seals >> Oil Seals >>Bore Design
Bore Design
Ressources techniques
- Le joints d’étanchéité Catalogue en ligne
- Construction de joints d’étanchéité
- Matériau de l’élément d’étanchéité de propriétés
- Sélecteur de compatibilité avec les fluides
- La tolérance de joints d’étanchéité
- Conception de l’arbre
- Conception d’alésage
- L’installation du joints d’étanchéité
- Échange de joint d’arbre (national et SKF / CR)
- Glossaire de termes du joints d’étanchéité
- Feuille de conception de joints d’étanchéité
Bore Material
Steel and cast iron are typically used for bore housings as they provide a good surface for accepting both metal and rubber O.D. seals. For soft metal, such as Aluminum, a rubber O.D. is recommended. There is no recommended Rockwell hardness for the bore. However, the bore should be of sufficient hardness to withstand the seal’s O.D.
Bore Finish
The bore finish should be 0.8 to 1.6 μm Ra (32 to 64 μin Ra) for metal O.D. seals and should be 2.5 to 5.0 μm Ra (100 to 200 μin Ra) for rubber O.D. seals.
If surface roughness exceeds this then paint sealant can be added to the O.D. of the metal seal.
Bore Lead-in Chamfer
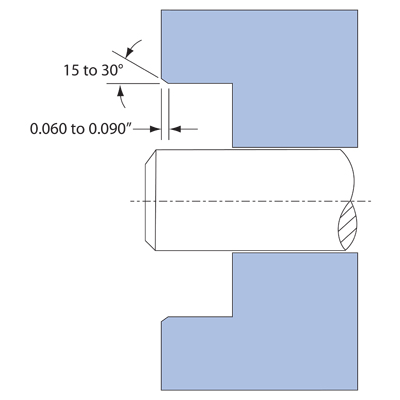
The lead corner, or entering edge of the bore should be chamfered and free of burrs (See figure below).
Bore Tolerance in Inches
| Bore Diameter | Bore Tolerance |
|---|---|
| up to 3.000 | +/- 0.001 |
| 3.001 to 6.000 | +/- 0.0015 |
| 6.001 to 10.000 | +/- 0.002 |
| 10.001 to 20.000 | + 0.002 – 0.004 |
| 20.001 to 40.000 | +0.002 – 0.006 |
| 40.001 to 60.000 | +0.002 – 0.010 |
Bore Tolerances in Metric
| Bore Diameter | Bore Tolerance |
|---|---|
| up to 6 | + 0.018 / – 0.000 |
| 6 to 10 | + 0.022 / – 0.000 |
| 10 to 18 | + 0.027 / – 0.000 |
| 18 to 30 | + 0.033 / – 0.000 |
| 30 to 50 | + 0.039 / – 0.000 |
| 50 to 80 | + 0.046 / – 0.000 |
| 80 to 120 | + 0.054 / – 0.000 |
| 120 to 180 | + 0.063 / – 0.000 |
| 180 to 250 | + 0.072 / – 0.000 |
| 250 to 315 | + 0.081 / – 0.000 |
| 315 to 400 | + 0.089 / – 0.000 |
| 400 to 500 | + 0.097 / – 0.000 |
